Dreamforce is Coming…

Another year is half over, and all of a sudden I find myself planning for Dreamforce again. This year will be my tenth Dreamforce in a row. It really does sneak up on you, so it’s good to be prepared!

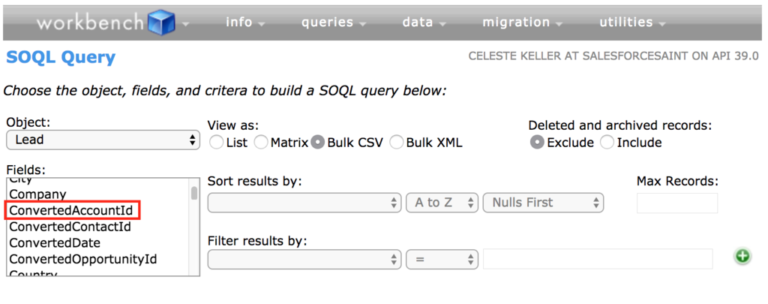
But before we get started with the tips, I want to share a handy tool that every Salesforce admin can benefit from. When you have a client who’s looking to implement Salesforce Service Cloud, consider using this import tool to migrate their data. It’s simple and can help your clients get started with Salesforce much faster.

Now back to the tips on how to get you ready for the biggest event of the year.

1. Register ASAP. Dreamforce registration just recently opened up, but you do not want to put off signing up! It’s difficult to get hotels outside of the registration portal (or in it, at this point). And last year, Dreamforce literally reached capacity and sold out – so don’t wait too long.

2. Hotel Reservations: Oh, you haven’t booked your hotel yet? OUCH. Seriously, this is going to be tricky for you. But it is still possible. Here are a few tactics for getting a hotel somewhere other than Oakland:

  • Search for hotels several times a day. As people change hotels or cancel their registrations, the rooms that they had reserved will become available again. Have your credit card ready though, because they will disappear just as quickly! September 29th is the cutoff date to cancel Dreamforce registration with a full refund, so the week prior is a great time to be searching. Seriously, that week – do a search every half hour if you can.
  • Reach out to the All Dreamforce group in the community, and ask if anyone would be willing to share their room – many people have booked hotel rooms with two beds and are fine with roommates.
  • Look for a room outside of the Dreamforce site. It can be done! Vacation rentalsAirbnb, and many other travel sites will have random available rooms pop up between now and the conference.

3. Join groups and participate in the Community! There are some great groups to join that will keep you updated on all things Dreamforce. The All Dreamforce group is a must. If this is your first Dreamforce, make sure to join the New to Dreamforce group too. There are also groups based on your role and company size. There are fun groups too – whether you will be spending your spare time at the gym or at the parties, there’s a group for that!

4. Get on the Road to Dreamforce! The Road to Dreamforce is full of news and tips that will help you get the most out of your trip to Dreamforce. You can sign up for updates here and watch videos and live webcasts here.

5. Add training or certification! On your Dreamforce registration confirmation page, there is a link to add training or add a certification exam. If you’ve been considering either of these, Dreamforce is the perfect opportunity. The certification exams are half price when taken at Dreamforce as well, so there is no better time. DO IT.

6. Start exploring sessions NOW!  The Agenda Builder has not yet gone live – launch date is TBD – but many sessions have already been posted here. As we get closer to agenda builder go-live, you will most likely be able to bookmark your favorite sessions ahead of time (like previous years) for easy reference. Some tips for session registration once the Agenda Builder is live:

  • Register for as many hands-on trainings (a.k.a. “HOTs”) as possible. You can find these by searching “hands-on.” These sessions are my favorites because you actually sit at a computer and are walked through the steps of creating/configuring something specific. They are also a great way to try something that you think is over your head or completely foreign to you, because the step-by-step instruction makes it so much easier to grasp. And you have access to the org that used in each hands-on session for 30 days afterward!
  • As it gets closer to session registration day, pay attention! You will receive an email notification from Dreamforce when session registration is available, but sometimes it’s a good idea to log in and check – the sessions go live incrementally, and they fill up quickly. Sometimes they go live at midnight, sometimes at 5:00am.
  • If too many of the sessions you want have filled up, don’t panic! Keep checking for added sessions between the initial go-live and the conference. The Dreamforce team is constantly working to add more to the schedule, and popular sessions will most likely be repeated during the conference.
  • If you still can’t register for a particular session that you absolutely must attend, you can still get in! A number of seats in every session are reserved for walk-ins. Just plan to get there early and wait in line.

7. Be smart about booking your flight. Who doesn’t love hanging out at the airport? Oh, you don’t? Then LISTEN UP. Keep in mind that the majority of attendees will be scrambling to get to the airport in the early afternoon on the final day of Dreamforce. There is usually a half-day of sessions that day as well, so I always try to leave late in the evening, or stay an extra day and have fun in the city before I go. If you decide to fly out on Thursday afternoon, be prepared for major delays. There were, what, 130,000 people at Dreamforce last year? So… just keep in mind what that could do to airport traffic.

8. Trailhead, Trailhead, Trailhead! There are two Trailhead badges that everyone should get prior to Dreamforce.

There is a very thorough Dreamforce FAQ which includes contact information, and should answer most of the usual questions and/or concerns. Another great place to get fast answers is the All Dreamforce group in the Community. I will be posting additional preparation tips as the big week draws closer, so stay tuned. Happy planning!

How I became an Admineloper

There is a point in the career of an advanced Salesforce admin where you ask yourself, “what next?” Some become managers, some move toward an analyst or an architect role, some become independent consultants, and some decide that they are tired of only knowing “clicks not code,” and try to learn Apex development.

For me, Apex was a logical next step. I definitely have a personality best suited to a developer role. I don’t like meetings – I would rather do the work than talk about the work. I’m not interested in self-employment, having done that once before. And management means more time managing people and less time managing my Salesforce org, so… nope!

But learning Apex was not as simple as I thought it might be. For someone with zero previous programming experience, it’s like learning a foreign language that doesn’t even use the alphabet. I attended Dreamforce sessions on Apex for admins. I even attended a week-long Salesforce class, but – although the class was pretty thorough and had good content – it still didn’t cover every single facet of coding for a true non-programmer. I’m talking about the little things, the super-newbie concepts – parentheses vs. curly brackets, what the semicolons do, etc. – that you need to know to write your own code from scratch. No matter how many sessions I attended, I could still only read Apex, and I wanted to write it!

But then I found out about the Radical Apex Developers (RAD) Women program. It’s completely volunteer-led, free of charge, and designed to help women who are advanced Salesforce admins learn Apex. This program requires a significant time commitment – you can read all the details мhere – and when I say significant, I mean it. I spent many hours between classes doing homework and reading. It’s challenging for a non-programmer, but by the end of this course, I was able to write an Apex trigger and class, all by myself!

I now consider myself more than an Advanced Admin – I’m an “Admineloper” and well on my way to calling myself a Junior Developer. Since I had honestly doubted that this could happen, I spent some time thinking about what made the RAD Women program work for me, where other methods of learning Apex had failed. This may or may not be true of all students of Apex – but here are the ways that I found RAD Women different, and why I believe it was successful for me:

  • Details! Everything used in Apex code is explained in great detail – parentheses, curly brackets, semicolons, formatting… everything.
  • Demos! Every session had demo time, where the coaches stepped through real Apex code examples and showed us how they were editing the code to achieve various goals.
  • Resources! Every session is recorded. Every week, there are pre-reading and/or Trailhead assignments – between sessions, I never stopped learning. And after the course was over, I could go back and review what we had done. This blog in particular is my favorite resource, because Kieren compares coding to cooking, making it completely relatable.
  • Personal attention! The class groups are small enough that there is plenty of time for individual questions during sessions. I felt like I could ask anything, even the most basic questions, without feeling intimidated or like I had a “stupid question.” In addition, my class coaches responded quickly to emails that I sent with questions or issues on my homework.

And what would this program be without its coaches? I interviewed Melissa Prcic, who was a RAD Women coach and is currently the Curriculum Lead, to find out if her experience as a coach was as exciting as mine as a student. I was not disappointed!

CK: Why did you decide to get involved with the RAD Women program?

MP: When I heard about the program I was immediately interested. I came into coding via a nontraditional route and it sounded like the kind of thing that I wish had been available when I was first learning. I loved the idea of leveraging knowledge about the platform as a natural entryway into building automation in code, and having experienced coaches there to guide you seemed perfect.

CK: Did you have any expectations the first time you coached a RAD Women class?

MP: I didn’t really know what to expect. I was delighted, and a bit surprised, to find that I really enjoyed talking through the concepts and demonstrating those concepts in demo code. I loved working with my co-coach, and hearing her explain concepts in a way I hadn’t considered before. Most of all I was blown away to see learners with little or no coding experience at the start, finish the class with a solid base of coding basics.

CK: What was your favorite thing about coaching?

MP: It’s always incredible to see how far some learners get in 10-weeks, and it’s inspiring how hard they’re willing to work to get there. I really believe that you get out what you put in – and I have seen learners go from thinking about quitting in week 2, to worrying about whether the pattern in their trigger handler is sub-optimal in week 10. Never underestimate determination!

CK: How has coaching others helped you with your own professional or personal development?

MP: There is nothing like teaching something to make you really, really learn it. I developed a deeper and more complete set of knowledge, often because of something my co-coach brought up, or because I had to find a new way to explain something I thought I knew for a learner. I have also made many connections with the incredible network of coaches, learners and supporters of RAD. I feel like my professional network is much stronger because of RAD and I’m so grateful to be a part of it.

CK: How have your RAD Women students surprised you?

MP: Honestly, I’m surprised at how much they underestimate both their ability, and how challenging learning to code can be. There’s such a mystique around coding and programmers these days, and I think some people get the impression that it’s either something you are magically good at or you’ve been doing since you were 12, and if neither of those apply to you it’s just impossible to learn. Both are wrong. It’s a skill that can be learned, and if you’re an advanced administrator in Salesforce, there’s a good chance that you have the baseline smarts and knowledge to be a really good Apex coder. However… it’s still a really challenging thing to learn! I see learners get super frustrated that they have to keep checking examples and sample code for syntax when they’re a few weeks into the program. I have to keep telling them that it’s normal. You will keep checking syntax for a long time. Not being immediately amazingly good at something is not an indication that you won’t ever be good at it. It. Takes. Time. (And practice, lots and lots of practice!)

CK: Did you have a mentor who contributed to your career as a developer?

MP: I had two wonderful mentors when I first started learning to code, once was our CTO and the other was a lead developer. They both encouraged me to start down this path and it was their confidence that I could do this thing, that really encouraged me to go for it. I view participating in RAD as a way to pay it forward. If it wasn’t for their encouragement and support, I don’t think I’d be doing what I’m doing now.

CK: What advice would you give someone who really wants to learn Apex, but feels intimidated or doesn’t know where to start?

MP: Start small and find a buddy/mentor/coach. One of the tenants of programming is breaking a problem down into its smallest solvable parts. This is also a great approach when you’re learning because you can pick a manageable task (fix a query) and get the wins that will keep you going. You also need someone to encourage you along the way and answer questions. Luckily, this is an incredibly supportive community! Get on Twitter, get on theSuccess Community, and don’t be afraid to ask.

If you are interested in becoming a RAD Women student, jointhis Success Community groupand watch for announcements about upcoming courses. Note: the time commitment is significant! If you plan on signing up for a course – they are 10 weeks long – the more spare time you set aside, the more you can immerse yourself in learning, and the more you will get out of it!

And finally, I’d like to give big thanks and shout-outs to: Angela Mahoney and Kieren Jameson for starting the RAD Women program (and talking me into it!), Adam Olshansky and Nadim Diaz for being awesome coaches and answering a million emails from me, Trinetra Rawls for being my project partner and geeking out with me as we figured things out, and Melissa Prcic for sharing your experiences as a RAD Women contributor.

* Image courtesy of Kieren Jameson and Women Code Heroes

Reporting on “Created by lead convert”

No, this is not another story about how it is “better to do something the hard way” – puhleeze, we all know that’s a myth. Ever do something the hard way unnecessarily, then discover afterward that there was a much easier way? Of course you have. We all have. This is one of those stories.

“How many of our accounts were created by converting a lead?” This sounded like a simple, straightforward request. So, feeling pretty darn smart because I knew how to get converted lead info – including the account IDs – off to Workbench I went.

Now, I’m not knocking Workbench – it’s one of my favorite admin resources! In a Workbench SOQL query, I can export converted lead IDs, plus the IDs of accounts, contacts, and opportunities that were created upon lead conversion. (And for more Workbench tricks, check out this blog post!)

My Workbench query yielded some great information. But it also required some Excel trickery, because although it provided the ever-useful ConvertedAccountId, some of those IDs appeared multiple times in the list – it will not differentiate between a lead converted to a new account vs. a lead converted into an existing account. So I had to go through and remove all duplicate ConvertedAccountId values.

In addition, all I could send to the person who requested this information was a number. I could also have attached the spreadsheet, but what if they wanted this information again in the future? I’d have to go through the same manual process again.

And then, guess what I found… an easy way to get that same info. And when I say “easy” I really mean “so easy that it blew my mind.” Here’s how:

  • Create a new report using the Account History report type.
  • Add the report filter Field / Event equals Created by lead convert.
  • Set a date range if you want a specific time period, or leave the dates blank to show the total number of accounts that were created by converting a lead.

Now I have a report that anyone can run in real time to get that total. How cool is that? Honestly, I’m a little embarrassed that I had no clue that an account history report contained that handy little trick. But better late than never – this is going to be extremely useful!

A couple of bonus things that I learned while playing with these reports:

  • You can also use this trick in a Contact History report or an Opportunity Field History report.
  • You can use two filters, if you want to compare records created via lead convert vs. records created manually – just use the filter Field / Event equals Created by lead convert, Created., and turn your report into a summary report grouped by Field / Event. (Make sure to add a period after “Created” or it will not return those records.)

And I just wouldn’t be myself if I didn’t give you some disclaimers:

  • If field history tracking is not enabled for the object in question, you cannot run a history report.
  • The data returned in your report will only go back to when your org began tracking – so if field history tracking has not been utilized since your org was first set up, you may be missing some records (depending on how far you want to go back).

Salesforce Limits Got You Down?

I hate limits. Speed limits. Cellular data limits. Insurance coverage maximums. Credit card limits. And don’t even get me started on those pesky Salesforce governor limits!

In the ten years I’ve been a Salesforce admin, I have run into almost every limit that exists in a Salesforce org. The frustration is the same every time. But over time, I’ve also discovered that many of those limits are negotiable – and all you have to do is ask!

Here are my favorite not-really-limits, which you can potentially increase by submitting a case to Salesforce support. Click on the links for more details, such as how to request the increase, and things to consider beforehand. Enjoy!

Workflow rules per object: Do you love workflow rules? Do you love them so much that you’ve reached the limit on your most popular objects? No worries – you can raise that limit from 50 rules per object to up to 300!

Roll-up summary fields: This limit increase once saved me during a particularly rollup-heavy project. Back in the old days – well really, it was just back before the Winter ‘16 release – the maximum for rollup summary fields was ten – can you even imagine?? In Winter ‘16, it was raised to 25 – but you can still get that limit to up to 40. (Note: you cannot raise this limit on just one object – any increase will apply to all objects.)

Dashboard filter options: Dashboard filters rock! Unless you need more than 10 of them. But wait – there is hope! You can have the limit on dashboard filters raised from 10 filters to up to 50.

Sharing rules per org: If you’re a security watchdog like me, you’ve probably built out a ton of sharing rules. What to do when you reach the limit of 300? Why, reach out to Salesforce support, of course! They can increase that limit from 300 to up to 500 sharing rules. (Note: this refers to the limit on total sharing rules. There are currently no increase options for the limit of 50 criteria-based sharing rules per object – but you can vote up that idea here.)

Archive Days for Activities: Salesforce archives certain events and tasks on a weekly basis and the default setting for the age of these activities is 365 days. But you can have that limit raised to up to 2555 days! (Note: Salesforce recommends a maximum of 1825 days to avoid performance issues.)

Recycle Bin Retention: Ever try to locate what you thought was a recently deleted record, only to find that it has already been purged from your org’s Recycle Bin? Can you believe you only have 15 days to undelete a record? Well, not anymore! This limit can be doubled to a Recycle Bin retention period of 30 days. Huzzah! 30 days to dig through the trash looking for user-deleted records!

Things to consider:

  • Salesforce does not just assign limits arbitrarily – they are in place to keep things running smoothly (as are all of the limits I mentioned at the start of this post). Before you request any limit increase, make sure you have tried all other options. Example: if you have access to a developer, consider populating number/currency fields with Apex code, rather than maxing out your roll-up summary field limits.
  • Keep in mind that increasing too many limits can severely affect system performance, and it may take longer to view/save records, run reports, etc. Is performance degradation something you are willing to tolerate in exchange for a limit increase? It’s a tough trade-off. Be ready to hear complaints from your users, and explain the situation to them.
  • Salesforce support requires that you supply a business reason when you request a limit increase. Based on your business need, they will decide whether or not to allow the increase – it is not guaranteed!

Curious to find out what else Salesforce support can enable for you? Check out this far-more-complete document – put together by the amazing Meighan Brodkey – for a comprehensive list of every feature that can be enabled.

Bonus: check out the only Limits I actually like!!