I was never a fan of Opportunity Teams (previously known as Sales Teams), because they didn’t do anything that I couldn’t accomplish with sharing. But in the Winter ‘13 release, teamwork took on a whole new meaning when the Opportunity Team became its own object. If you have multiple people working on an opportunity who have different roles and different access needs, then you should be taking advantage of this awesome, super-improved functionality! When properly customized to fit your business needs, your users will find the level of detail much more useful than before. And as an administrator, you will be able to add custom fields and validation rules – just as you would with any other object.
To get started, go to Setup | Customize | Opportunities | Opportunity Teams | Settings, check “Enable Team Selling” if it’s not already checked, and click Save.
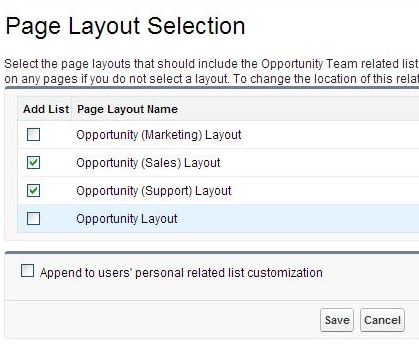
You will then be given the option to select which of your opportunity page layouts to display opportunity teams on.
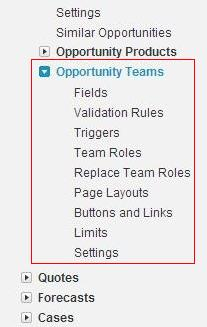
Once you do that and click Save, your customization sidebar will contain a new list of options for opportunity teams.
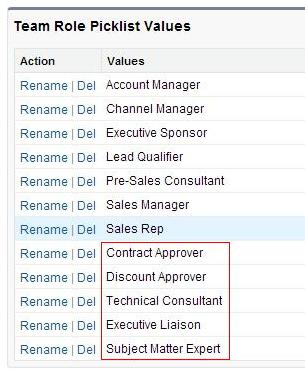
The opportunity team object will contain some standard fields already, such as User (lookup), Team Role (picklist), and Opportunity Access (picklist). Depending on how your users relate to an opportunity, you may want to add values to the Team Role picklist. It comes with several default values, but I added a few of my own:
You may also want some custom fields – for instance, I added a “Product” field that is a lookup to the product object. If your opportunities contain multiple products, this is a great way to show which product each team member is responsible for selling. I also added a “Department” picklist.
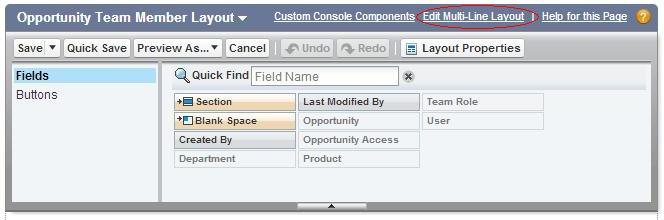
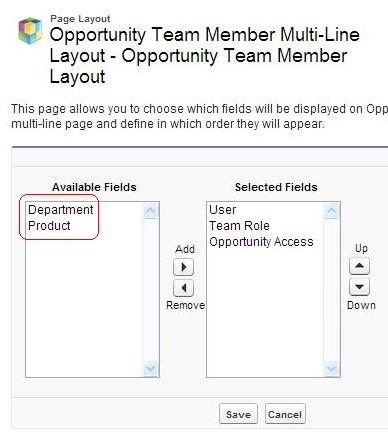
When you create custom fields on opportunity teams, it’s helpful to add them to the multi-line layout as well as the page layout, so that when new team members are added, all information can be entered at once. To do this, go to your opportunity team member page layout, click Edit, and then select the “Edit Multi-Line Layout” option up at the top.
Then move your new custom fields from the left to the right:
You will most likely also want them to show up on the opportunity’s list of team members, so you will also need to add them to the related list on the opportunity. To do this, go to an opportunity page layout, click Edit, and then select the wrench icon on the opportunity team related list.

Again, move your new custom fields from the left to the right:
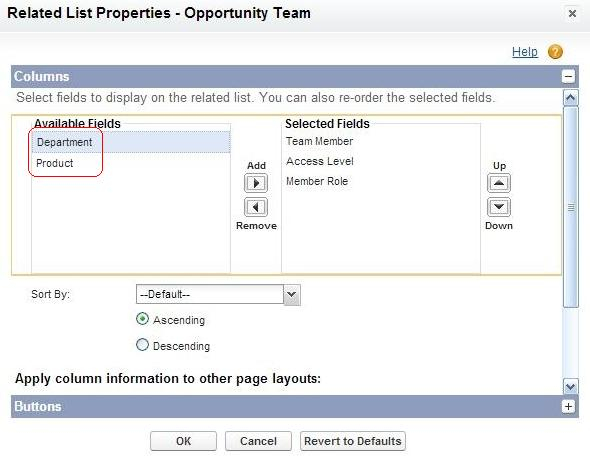
Once you have moved your new custom fields over, you can update that related list on other opportunity layouts – before you click “OK,” scroll down and you will see the “Apply column information to other page layouts” option. This saves you the trouble of editing the same thing on every layout.
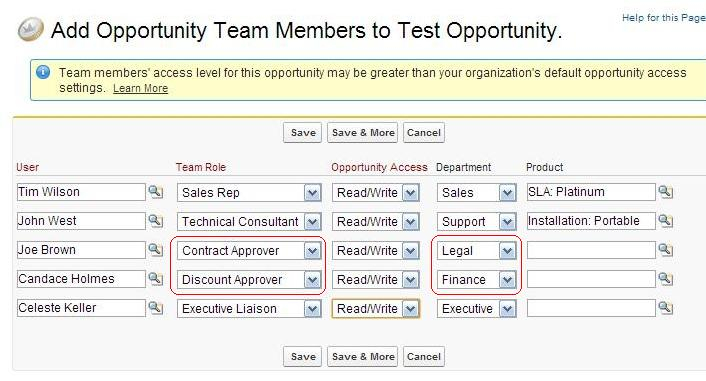
Now you are ready to add team members to an opportunity! Scroll down to the Opportunity Teams related list, click Add, and start adding users. If you need to make sure that only certain users have specific roles, you can also create validation rules on the opportunity team object to ensure data accuracy. For instance, I created rules to make sure that only users in the Legal department could be assigned the “Contract Approver” role, and only users in the Finance department could be assigned the “Discount Approver” role. (Another good option is to have your custom fields populated by a trigger.)
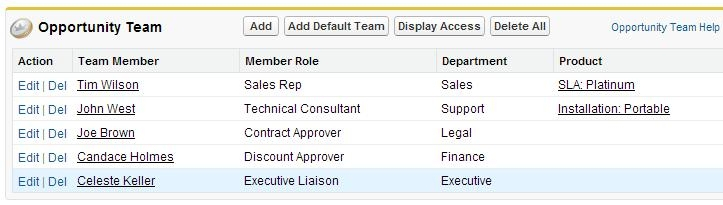
Click Save, and that’s it! Now you have a more complete look at the function of each member of an opportunity team.
There are many more ways to make use of this new object. Use multiple page layouts if you need varied levels of security – just as you would with any other object. Create custom report types with just the fields that you want your users to see. And create default opportunity teams or clone opportunity team members to make the process faster.
A few things to keep in mind:
- Workflow rules cannot be created on opportunity teams.
- Triggers and validation rules are not supported when default teams are added to an opportunity.
- An opportunity team cannot be the primary object in a custom report type (I recommend using Opportunities, then include Opportunity Teams).
For more detail, refer to the Help and Training documentation.
Liked this post? Follow this blog to get more.
